Solana is, without a doubt, one of the most vibrant Web3 communities around. As such, there’s a huge growing need for capable Web3 development tools from the Solana community. For example, creators who want to release NFT artwork on Solana NFT marketplaces or focus on NFT development will need to get Solana NFT metadata. While getting NFT metadata for Solana can be challenging without the right tools, it is just a few clicks away with the right Web3 tech stack. Also, with Moralis’ powerful Solana NFT API, you’ll be able to get Solana NFT metadata in a jiffy!
Moralis (a.k.a. the “Firebase for crypto“) offers a powerful Solana API which covers all your blockchain-related backend needs effortlessly. In this article, we will focus on using our JavaScript (React) skills to create a simple dapp (decentralized application). Along the way, you will learn how to complete the initial Moralis setup and how to import the Solana API. With that set in place, it is straightforward to get Solana NFT metadata with a single line of code. However, before we focus on building, we need to make sure you all know the basics. Thus, we will first answer the “what is Solana NFT metadata?” question. Then, we will add context with a demo of our example Solana NFT dapp. Nonetheless, make sure to create your free Moralis account to be able to follow along.

What is Solana NFT Metadata?
Unless you’ve been living under a rock, you know that NFTs are one of the most popular blockchain use cases. Sure, in many cases, NFTs are nothing but meaningless images saved on the blockchain. However, there are also a lot of reputable NFT projects out there, including on the Solana chain. Most of these projects offer some sort of platform where the NFT owners can utilize their unique tokens. Furthermore, this is where NFT metadata plays an important role. After all, NFTs and metadata go hand in hand. Nonetheless, you can’t create NFTs without their metadata (data that provides information about other data).
Furthermore, the metadata usually comes in the form of “.JSON” files, and it contains all the details about NFTs. This also includes URIs of the images that are the most common visual representations of NFTs. With that said, Solana NFT metadata refers to the metadata for NFTs created on the Solana chain.

Storing and Accessing NFT Metadata
You must note that in order to create NFTs, you need to have their details (metadata) and their files (images, videos, GIFs, PDFs, etc.) stored somewhere. But this is where many projects “cheat” by using centralized storage solutions. Sadly, this compromises the entire goal of decentralization.
Thus, it is important to focus on projects that store their NFTs’ files and metadata in a decentralized manner. When it comes to Moralis, we use IPFS. Hence, your files and metadata can upload to IPFS easily without breaking a sweat. You can even upload folders to IPFS, which can be extremely useful when batch minting NFTs. That way, your projects can meet a proper level of decentralization.
On the other hand, a proper Solana NFT API also enables you to access and utilize existing Solana NFTs. This is what this article goes over. To do this, we need to fetch Solana NFT metadata. Once you know how to do that, you can create all sorts of dapps revolving around Solana NFTs. For instance, you can neatly display Solana NFTs, create an advanced Solana NFT search engine, or even launch an NFT marketplace. Ultimately, the following sections will show you how to get started with Solana NFT programming. It’s also worth keeping in mind that the Moralis NFT API is cross-chain compatible, so it’s also the best Ethereum NFT API, Binance NFT API, and much more!
Get Solana NFT Metadata – Our Solana NFT Dapp Demo
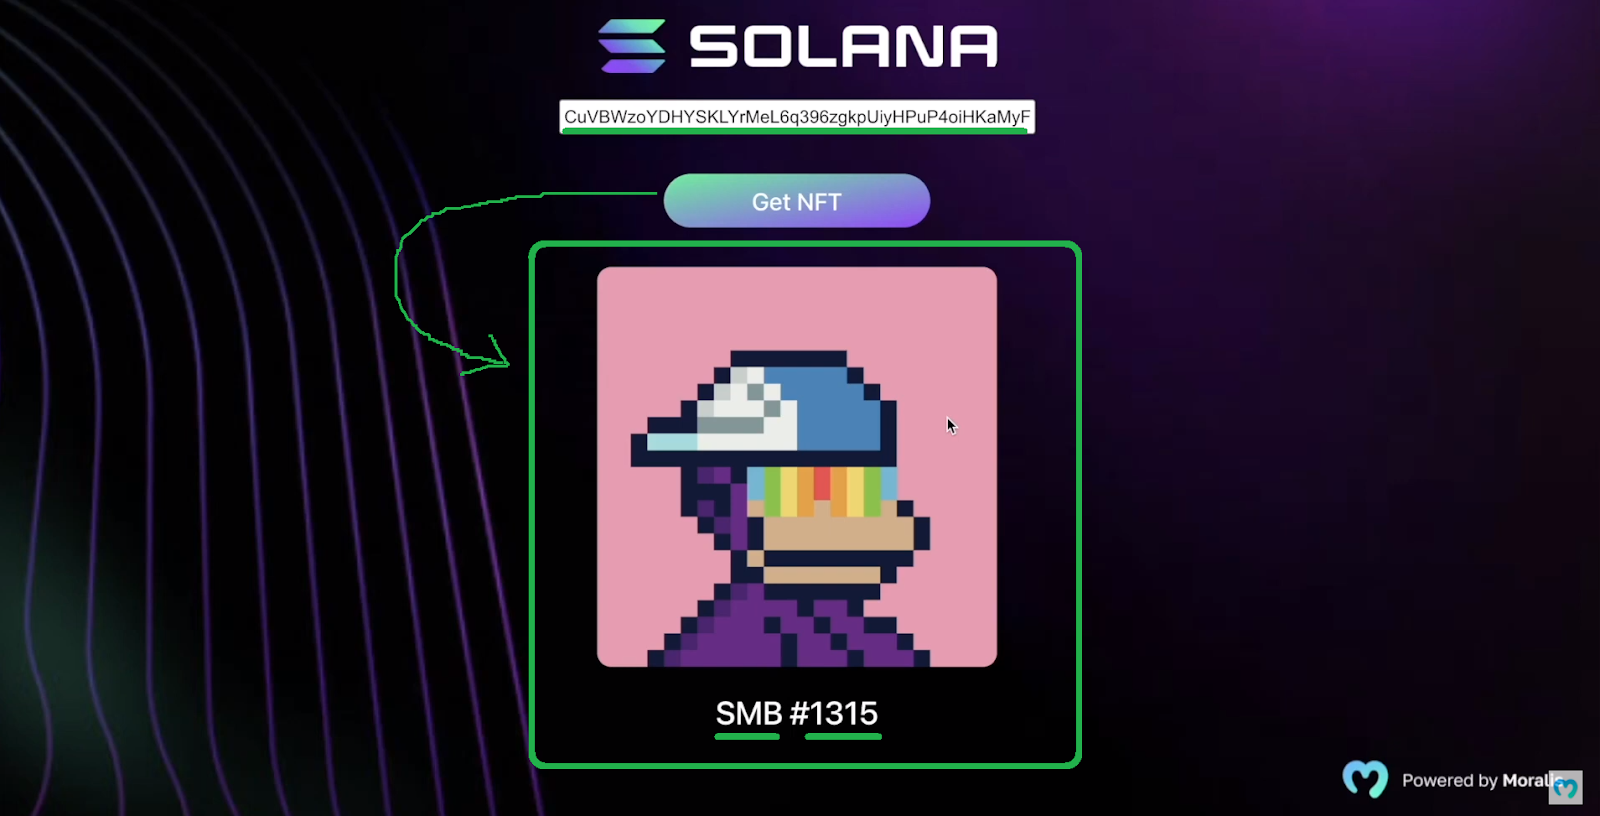
As mentioned, let’s look at a demonstration of our example Solana NFT dapp, which you will learn to create moving forward. As you can see in the following screenshot, we kept things simple:

The above image shows the gist of our example dapp. At the top, just below the Solana logo, it has an entry field. This is where users get to enter any Solana NFT address. To actually do something with the entered token address, users need to click on “Get NFT”. By doing so, our lines of code get Solana NFT metadata. As such, our dapp accesses the details related to the searched address.
Since we decided to keep things simple, our Solana dapp only displays the basics. These include the image of the related NFT, the name of the collection, and the token ID. However, a lot of additional data is at our disposal. Of course, users can repeat the search for other Solana NFTs. Following are another two examples of our dapp in action:
- Search results for one of the “Okay Bear” NFTs:

- Search results for one of the “Solana Monkey Business (SMB)” NFTs:
How to Get Solana NFT Metadata with React and Moralis
It is now time to roll up your sleeves and follow our lead. You have two options: you can build your own instance of a Solana NFT dapp from scratch or use our code. Our code is readily available in this GitHub repository. The folder includes all the assets you saw in the demo above (logos, background, etc.). Although, as you can imagine, you will get the most out of this tutorial if you implement the code yourself, following our lead.
First, let’s look at the structure of our “NFT-SOLANA” project:
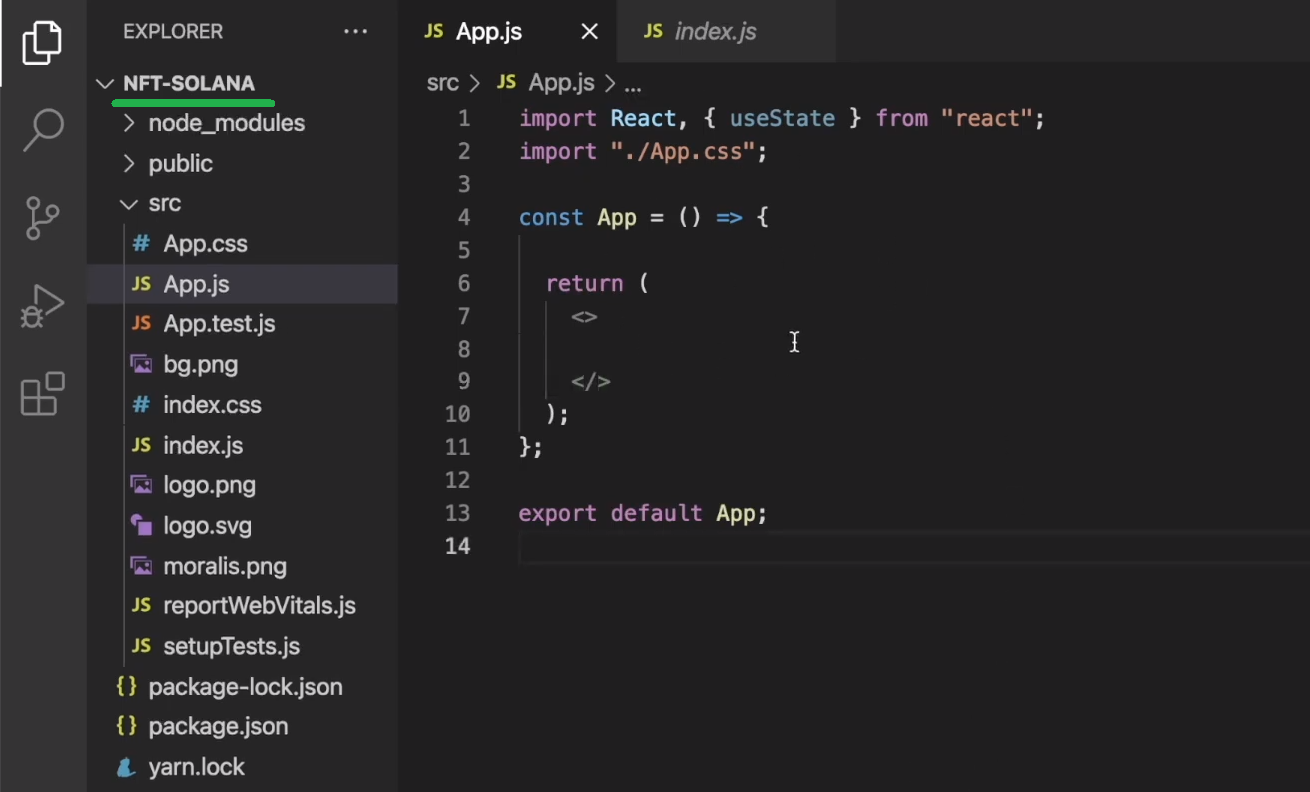
As you can see in the screenshot above, we start with a basic React app template. At this point, our application has nothing to do with Web3 yet. To make that transition, you must connect your code with the Moralis SDK, including the Solana API. Hence, you need to complete some initial Moralis setup steps to enable you to create a Moralis dapp. Then, you’ll be able to obtain that server’s details and paste them into the “index.js” file:

Getting Started with Moralis
To get Solana NFT metadata, you need to complete the initial Moralis setup. Fortunately, getting started with Moralis is quite straightforward. It includes the following six steps:
- Use the “create your free Moralis account” link mentioned at the beginning of this article. However, if you already have an active account, make sure to log in:

- Once inside your Moralis admin area, click on the “Create a new Server” button (located inside the “Servers” tab):

- Choose an appropriate server type:

- Enter your server name and select the city nearest to your location. Also, select the chains you are interested in. When using the Solana API to fetch metadata, you can use any chain. Finally, run your server with a click on “Add Instance”:

- Click on “View Details” to access your server URL and application ID and copy them:

- Paste the above-copied details into the designated area of the “index.js” file. See the last image of the previous section.
Start with a Simple React App
With the Moralis setup under your belt, you can start building your Solana NFT dapp, which will get Solana NFT metadata. You should start with a simple React application. Hence, open “App.js” and define some state variables inside “const App”:

The above screenshot shows you that these variables will serve to store the key parameters of our dapp. These include the entered address and the NFT’s name and image. With the variables in place, you can focus on adding the lines of code that will form a user interface (UI). You can start with the title, followed by the address entry field. Also, make sure to add the button which will trigger the NFT search:

Next, we recommend you run your dapp to check if everything is running smoothly:

The screenshot above shows you what you should see at this stage. Thus, you ought to have a “naked” version of your Solana NFT dapp. The latter includes the title (“Solana NFT”), an entry field, and the “Get NFT” button. We don’t want you to worry about the styling yet. So far, we haven’t implemented any of the Web3 functionality; thus, our dapp doesn’t function yet. To make it work, we need to import the Solana API provided by Moralis.
Get Token’s Metadata Using the Solana NFT API
In the “App.js” file (at the top), add:
import { useMoralisSolanaApi } from "react-moralis";
The above line of code will import the Solana API. However, you also need to install “react-moralis” to make it work. You do this with the “npm i react-moralis” or “yarn add react-moralis” commands. Then, you can call the above-imported “useMoralisSolanaApi” hook:
const SolanaApi = useMoralisSolanaApi();
Then, focus on coding the “NFTsearch” function:

Note: With “mainnet”, as seen above, we are focusing on NFTs located on the Solana mainnet. However, you could instead enter “devnet” if you were to focus on the Solana testnet.
After you’ve defined the network, you need to ensure that “NFT search” gets the NFT that matches the searched address. Thanks to the Moralis Solana API, you get to use the power of “getNFTMetadata”. As such, a single line of code gets the job done:
const nftResult = await SolanaApi.nft.getNFTMetadata(options);
Yes, the “getNFTMetadata” is the key that enables you to get Solana NFT metadata. In addition, make sure you log the results by adding “console.log(nftResults);”. The latter will let you see the results using your browser’s console (the “inspect” option).
By adding the above line of code, your dapp should already be performing the heavy lifting on the backend. You can check that by running it and entering a Solana NFT’s token ID. Moreover, you can use OpenSea to get token IDs:

Simply copy the token ID and paste it into your dapp’s entry field. Also, make sure to open your browser’s console:

The screenshot above shows that your dapp already fetches an object when clicking on the “Get NFT” button. Moreover, that object contains all the details related to the searched token ID:

The path to the searched NFT’s image (among other details) is inside the metadata:
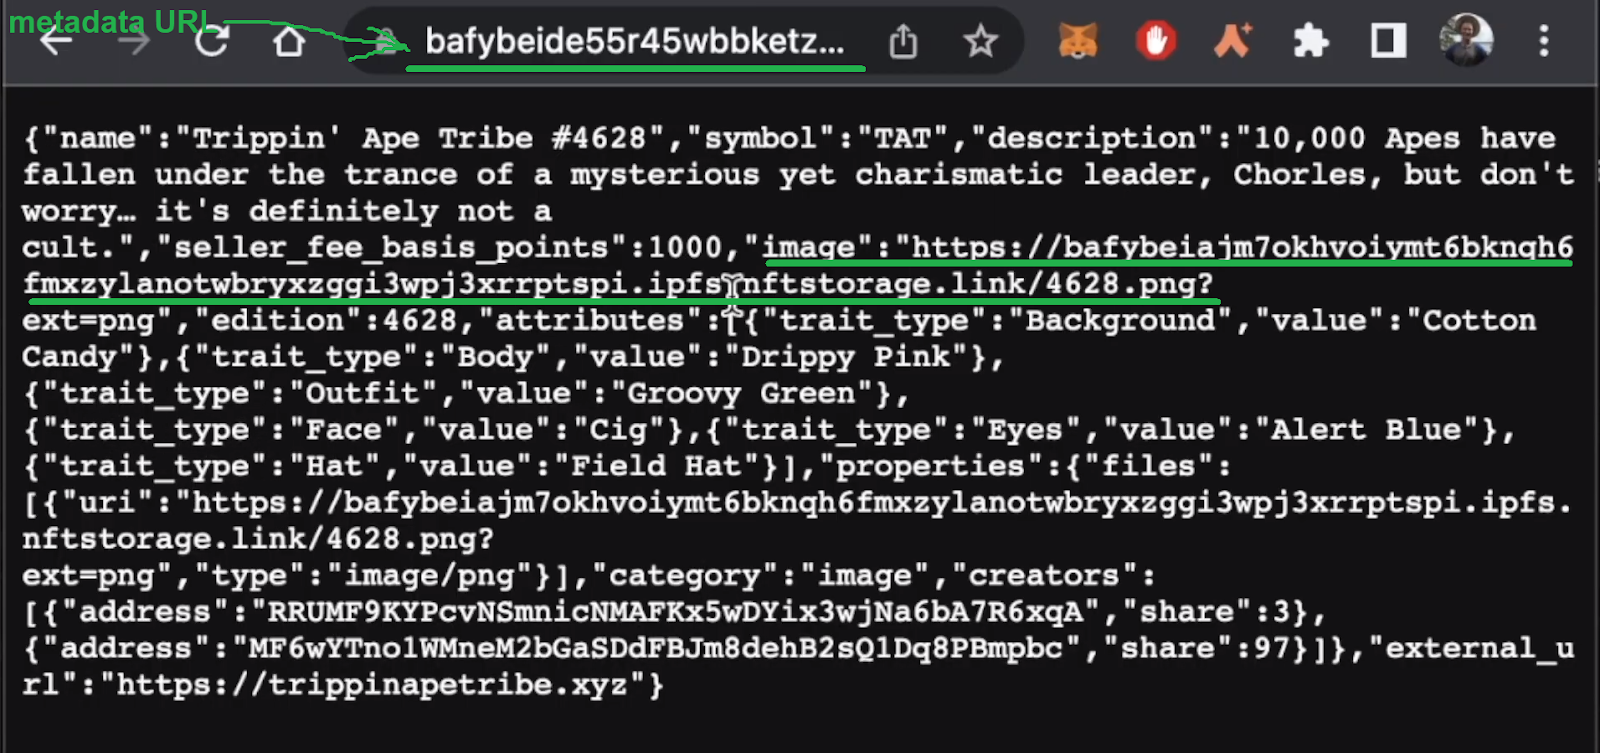
Get Solana NFT Metadata – Image URI and Collection Name
You can see in the screenshots above that you now have a way to get Solana NFT metadata and other details. Hence, you have all you need to populate your Solana NFT dapp. As such, you are ready to implement the ability to display the images, collection names, and token IDs of any Solana NFT:
For collection names and token IDs, “setName” does the trick:
setName(nftResult.name);
On the other hand, it is a bit trickier to display the images. After all, their URLs are packed inside NFTs’ metadata. As such, you need to use the code that will extract those details properly:
    let uri = nftResult.metaplex.metadataUri;

    try {
      await fetch(uri)
        .then((response) => response.json())
        .then((data) => {
          setImage(data.image);
        });
    } catch {
      console.log("couldnt get image");
    }
You can now run your dapp again. If you’ve followed our lead properly, it should function as demonstrated in the demo:
If you know the basics of CSS, you will easily add the styling needed to convert the above into this:

Note: Our code (the “GitHub” link above) contains all the styling code/files.
In addition, here’s also a video tutorial of an in-house Moralis expert completing the above-presented project:
How to Get Solana NFT Metadata – Summary
In this article, you had a chance to learn how to get Solana NFT metadata with a single line of code. You now know that the “getNFTMetadata” method does the trick. Also, you know that in order to use that hook, you need to have Moralis set up properly. With your Moralis server up and running, you can install “moralis-react” and import the Solana API. Furthermore, we encourage you to take the above example further by implementing other functionalities. In addition, if you are serious about Solana programming, you ought to learn how to authenticate Solana users with Phantom wallet. On top of that, you may also want to create a Solana token and build a Solana token dashboard. However, if you are not familiar with the Solana token standard yet, make sure to check out the SPL vs ERC20 tokens comparison.
On the other hand, you may want to explore other blockchain development topics and tackle other example projects. If so, the Moralis Web3 blog is just the place for you. Some of the latest topics demonstrate uploading Web3 Unity metadata, how to create an NFT on-chain inventory system, building a decentralized Twitter, everything you need to know about Web3 frontend and dapp development. Ultimately, Moralis has everything you need to become a Web3 developer. If you are looking for a professional path to becoming a blockchain developer, Moralis Academy is the best choice!